0. Props & State ?
React Native는 React에서 파생되었기 때문에 대부분의 개념이 React와 동일하다.
Props와 State 역시 리액트의 핵심 개념이다.
Props
부모 컴포넌트로부터 자식 컴포넌트로 전달되는 데이터이다. 전달받은 데이터는 자식 컴포넌트에서 변경이 불가능하다.
State
컴포넌트 안에서 유동적으로 데이터를 다룰 때 사용하며, 컴포넌트 안에서 데이터를 변경할 수 있다.
즉, State는 컴포넌트의 상태를 나타낸다.
1. 프로젝트 준비
react-native init Counter --template react-native-template-typescriptReact Native CLI를 사용해서 타입스크립트용 프로젝트를 생성하였다.
npm install --save styled-components
npm install --save-dev @types/styled-components @types/styled-components-react-native babel-plugin-root-import
추가로 편하게 개발하기 위해서 Styled Components, babel-plugin-root-import를 설치한다.
설치가 완료되면 절대 경로 설정을 위해서 babel.config.js 파일을 열고 수정한다.
module.exports = {
  // ...

  plugins: [
    [
      'babel-plugin-root-import',
      {
        rootPathPrefix: '~',
        rootPathSuffix: 'src',
      },
    ],
  ],
};
그리고 마찬가지로 tsconfig.js도 수정을 해준다.
// prettier-ignore
{
  "compilerOptions": {
    // ...

    "baseUrl": "./src",
    "paths": {
      "~/*":["*"]
    },

    // ...
  },
  "exclude": [
    "node_modules", "babel.config.js", "metro.config.js", "jest.config.js"
  ]
}
소스코드를 한 곳에서 관리하기 위해서 src 폴더를 생성하고 App.tsx 파일을 src 폴더로 이동시킨다.
2. 개발
1. Button 컴포넌트
공통 컴포넌트로 플러스 ( + ) 기호 이미지와 마이너스 ( - ) 기호 이미지를 가지는 Button 컴포넌트를 만들 것이다. 이미지는 Material Design에서 add_circle과 remove_circle을 가져왔다.
이미지를 다운받으면 압축을 풀고 src/Assets/Images 폴더를 만들어서
add.png, add@2x.png, add@3x.png와 remove.png, remove@2x.png, remove@3x.png로 변경해 넣는다.
@2x, @3x는 이미지 파일 이름의 규칙으로 이미지를 불러올 때 리액트 네이티브가 해당 화면 사이즈에 맞는
이미지를 자동으로 불러온다.
import React from 'react';
import Styled from 'styled-components/native';

const Container = Styled.TouchableOpacity``;
const Icon = Styled.Image``;

interface Props {
  iconName: 'plus' | 'minus';
  onPress?: () => void;
}

const Button = ({iconName, onPress}: Props) => {
  return (
    <Container onPress={onPress}>
      <Icon
        source={
          iconName === 'plus'
            ? require('~/Assets/images/add.png')
            : require('~/Assets/images/remove.png')
        }
      />
    </Container>
  );
};

export default Button;
React Native의 TouchableOpacity와 Image 컴포넌트를 사용해서 Button을 구현했다.
interface Props {
    iconName: 'plus' | 'minus';
    onPress?: () => void
}
Button 컴포넌트는 iconName과 onPress라는 두 가지 Props를 가지고 있다.
이때 타입스크립트를 사용해서 iconName은 plus 혹은 minus 값만 받을 수 있고, onPress는 필수가 아닌
함수로 만들었다.
<Container onPress={onPress}>
      <Icon
        source={
          iconName === 'plus'
            ? require('~/Assets/images/add.png')
            : require('~/Assets/images/remove.png')
        }
      />
</Container>
Icon은 React Native의 Image 컴포넌트로써 Props인 source를 나타낸다.
HTML의 Image 태그와 다르게 require 구문으로 이미지를 불러오는데, 기본 사이즈의 이미지를 연결하고
화면 크기에 따라 2x, 3x 크기의 이미지를 자동으로 불러와 나타낸다.
2. Counter 컴포넌트
import React, {useState} from 'react';
import styled from 'styled-components/native';
import Button from '~/Components/Button';

const Container = styled.SafeAreaView`
  flex: 1;
`;

const TitleContainer = styled.View`
  flex: 1;
  justify-content: center;
  align-items: center;
`;

const TitleLabel = styled.Text`
  font-size: 24px;
`;

const CountContainer = styled.View`
  flex: 2;
  justify-content: center;
  align-items: center;
`;

const CounterLabel = styled.Text`
  font-size: 24px;
  font-weight: bold;
`;

const ButtonContainer = styled.View`
  flex: 1;
  flex-direction: row;
  flex-wrap: wrap;
  justify-content: space-around;
`;

interface Props {
  title?: string;
  initValue: number;
}

const Counter = ({title, initValue}: Props) => {
  const [count, setCount] = useState<number>(0);

  return (
    <Container>
      {title && (
        <TitleContainer>
          <TitleLabel>{title}</TitleLabel>
        </TitleContainer>
      )}

      <CountContainer>
        <CounterLabel>{initValue + count}</CounterLabel>
      </CountContainer>

      <ButtonContainer>
        <Button iconName="plus" onPress={() => setCount(pre => pre + 1)} />
        <Button iconName="minus" onPress={() => setCount(pre => pre - 1)} />
      </ButtonContainer>
    </Container>
  );
};

export default Counter;
만들어둔 Button 컴포넌트를 활용해서 Counter 컴포넌트를 만들 것이다.
interface Props {
  title?: string;
  initValue: number;
}
title은 ' string ' 타입이고 필수이며, initValue는 ' number ' 타입인 필수가 아닌 값을 가지고 있다.
const [count, setCount] = useState<number>(0);숫자형 타입을 가지고 있는 state를 만들었다.
<number>를 사용해서 정확히 숫자형 타입이라는 것을 명시했다.
3. App
/**
 * Sample React Native App
 * https://github.com/facebook/react-native
 *
 * Generated with the TypeScript template
 * https://github.com/react-native-community/react-native-template-typescript
 *
 * @format
 */

import React from 'react';

import {
  Colors,
  DebugInstructions,
  Header,
  LearnMoreLinks,
  ReloadInstructions,
} from 'react-native/Libraries/NewAppScreen';

import Styled from 'styled-components/native';
import Counter from './Screens/Counter';

const Container = Styled.View`
  flex:1;
  background-color:#eee;
  `;

const App = () => {
  return (
    <Container>
      <Counter title="Counter App" initValue={0} />
    </Container>
  );
};

export default App;
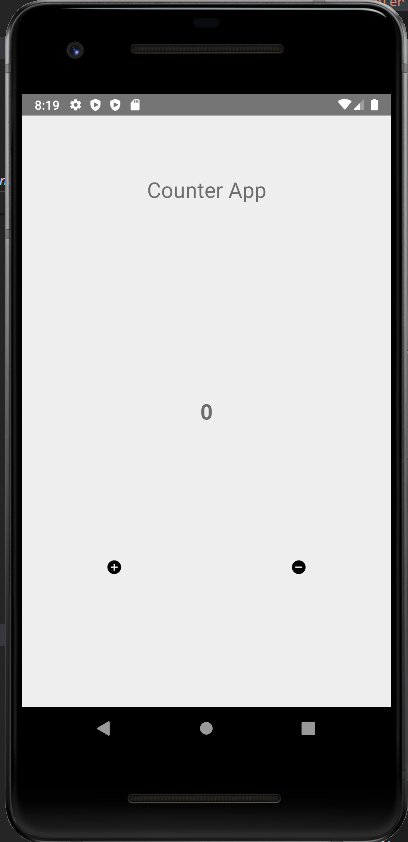
마지막으로 Counter 컴포넌트를 불러와서 화면에 표시했다.
3. 결과물

https://github.com/SeoJaeWan/Counter
GitHub - SeoJaeWan/Counter
Contribute to SeoJaeWan/Counter development by creating an account on GitHub.
github.com
'React Native > TypeScript' 카테고리의 다른 글
| [React Native] Todo 앱 - Context & AsyncStorage_2편 (2) | 2022.07.20 |
|---|---|
| [React Native] Todo 앱 - Context & AsyncStorage_1편 (1) | 2022.07.19 |
