
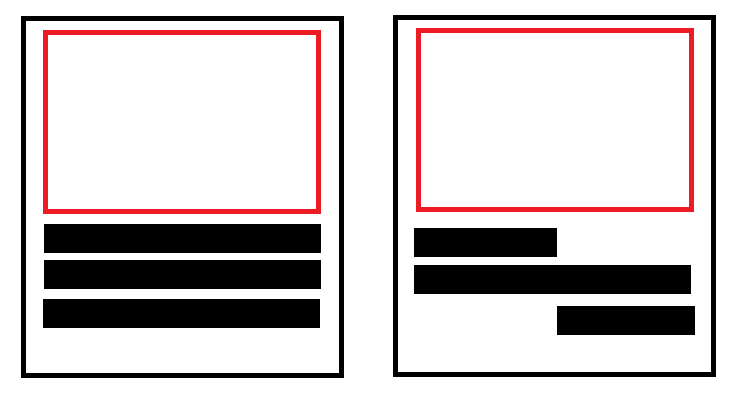
프론트엔드 개발을 하다보면 컴포넌트를 만들 때
컴포넌트를 만들다보면 유사한 디자인에서 조금 조금씩 다른 부분이 존재한다.
이런 경우 각각의 컴포넌트를 다 만들기에는 동일한 기능이 많고 반복되는 코드로 인해
추후 유지 보수를 하는 경우 하나의 기능을 수정해야 하는 경우 관련된 모든 곳을 수정하는 불편함이 존재한다.
const OuterFrameOne = () => {
  return (
    <outerFrame
      style={{
        width: "500px",
        height: "500px",
      }}
    >
      <frame></frame>
      <div>
        <long></long>
        <long></long>
        <long></long>
      </div>
    </outerFrame>
  );
};

const OuterFrameTwo = () => {
  return (
    <outerFrame
      style={{
        width: "500px",
        height: "500px",
      }}
    >
      <frame></frame>
      <div>
        <leftShort></leftShort>
        <long></long>
        <rightShort></rightShort>
      </div>
    </outerFrame>
  );
};
코드로 구현하면 다음과 같은 방식으로 나올 것이다.
outerFrame과 frame 부분은 동일한데 아래 텍스트 부분이 달라서 새롭게 만드는 경우도 있다.

이렇게 된 경우 앞서 말한 것처럼 outerFrame이 변경되는 경우
OuterFrameOne 컴포넌트와 OuterFrameTwo 컴포넌트를 모두 변경해야하는 문제가 발생한다.
바로 이런 경우 children을 사용할 수 있다.
const OuterFrame = ({children}) => {
  return (
     <outerFrame
      style={{
        width: "500px",
        height: "500px",
      }}
    >
      <frame></frame>
      {children}
    </outerFrame>
  )
}

const OuterFrameOne = () => {
  return (
    <OuterFrame>
      <div>
        <long></long>
        <long></long>
        <long></long>
      </div>
    </OuterFrame>
  );
};

const OuterFrameTwo = () => {
  return (
    <OuterFrame>
      <div>
        <leftShort></leftShort>
        <long></long>
        <rightShort></rightShort>
      </div>
    </OuterFrame>
  );
};
추후 outerFrame이 변경되는 경우 OuterFrame 컴포넌트만 변경하면 되기 때문에 훨씬 코드가 깔끔해진다.
반복되는 템플릿이 있다면 위와 같이 컴포넌트를 재활용할 수 있다는 장점이 있다.
여기서 끝나면 아쉽고 children을 사용해서 만든 디자인 패턴인 Headless UI Pattern을 한번 알아보자!
Headless UI Pattern
UI 와 상태 관리를 제공하지만 실제 UI는 제공하지 않는 컴포넌트의 디자인 패턴이다.
- 상태는 모두 공유가 되지만 UI는 사용자가 원하는 대로 구현할 수 있다.
- UI 디자인과 비즈니스 로직이 분리되므로 관리와 유지 보수가 용이하다.

이것만 들었을 때는 어떤 방식으로 만들어야 하는지 감이 오지 않을 수 있다.
import { Children, cloneElement, useState } from "react";

const Tabs = ({ children }) => {
  const [activeTab, setActiveTab] = useState(0);

  const handleClick = (index) => {
    setActiveTab(index);
  };

  return Children.map(children, (child, index) => {
    if (child.type.name === "Tab") {
      return cloneElement(child, {
        isActive: index === activeTab,
        onClick: () => handleClick(index),
      });
    } else if (child.type.name === "TabPanel") {
      return index % 2 === activeTab ? child : null;
    }
    return child;
  });
};

const Tab = ({ isActive, onClick, children }) => {
  return (
    <button
      style={{ fontWeight: isActive ? "bold" : "normal" }}
      onClick={onClick}
    >
      {children}
    </button>
  );
};

const TabPanel = ({ children }) => {
  return <div>{children}</div>;
};

const Home = () => {
  return (
    <Tabs>
      <Tab>Tab 1</Tab>
      <Tab>Tab 2</Tab>
      <TabPanel>Content for Tab 1</TabPanel>
      <TabPanel>Content for Tab 2</TabPanel>
    </Tabs>
  );
};

export default Home;
Tabs 컴포넌트는 전체 인터페이스를 관리하고 있다.
const Tabs = ({ children }) => {
  const [activeTab, setActiveTab] = useState(0);

  const handleClick = (index) => {
    setActiveTab(index);
  };

  return Children.map(children, (child, index) => {
    if (child.type.name === "Tab") {
      return cloneElement(child, {
        isActive: index === activeTab,
        onClick: () => handleClick(index),
      });
    } else if (child.type.name === "TabPanel") {
      return index % 2 === activeTab ? child : null;
    }
    return child;
  });
};
자식으로 전달받은 컴포넌트를 전부 렌더링하며 미리 약속된 명칭인 Tab에게는 isActive와 onClick 이벤트를 넘겨준다.
그리고 TabPannel은 Tab에게 전달한 이벤트로 인해 변경되는 activeTab에 따라 렌더링이 될지 말지를 결정한다.
이렇게하면 Tab 기능을 구현하기 위해서 UI와 비즈니스 로직을 구분해서 작업이 가능해졌다.

'React > 실험실' 카테고리의 다른 글
| [React] Atomic Design Pattern + Headless UI Pattern (1) | 2024.01.07 |
|---|---|
| [React] 아이폰 100vh 오류 (2) | 2023.12.30 |
| [React] Effect가 필요하지 않을 수 있다. (1) | 2023.11.20 |
| [React] Swiper 잘 쓰기 - AutoPlay Pause Resume (1) | 2023.11.04 |
| [React] 빌어먹을 iOS - vh 편 (0) | 2023.08.29 |